Wednesday, August 31, 2011

How to Make a Paper Flower Backdrop: Let's Finish It!

And here we are, at the final part of our How to Make a Giant Paper Flower Backdrop tutorial.  In case you missed it, learn how to make all the other flowers for this backdrop in Part One and Part Two.

Paper Flower Dessert Table Backdrop

Today we'll learn how to make the last flower, what I call the Rolled Cone Flower.  As before, you'll need more of that roll of paper, scissors, and a glue gun.  Tape is handy for this one, too, but not necessary.

This is what I mean by Rolled Cone Flower:

These are incredibly easy, and you can make them very large.  This is good for two reasons.  First, because the large scale is dramatic.  Second, the larger your flowers are, the fewer you have to make!

First, cut your petals.  They should look like slightly tapered U shapes (narrower at the top of the U).  But don't knock yourself out worrying about getting it just right.  Rhatever you cut will be just fine.  Really.


Roll each petal into a cone, and secure with tape or hot glue.  Tape is faster, but the glue gun works just as well.

Arrange the cones so that they form a circle, with the points meeting in the middle.  I usually used six for each flower, but it really depends on the size of your petals.  Use as many as you need.  Glue together using the glue gun.


Make a fringe flower center, if desired, and glue to the center of the flower.

The only other element on the backdrop were the leaves.  These were insanely simple to make, and were great filler.  I used a lot of leaves.


The instructions for these are pretty darn obvious.  Cut out leaf shape.  Fold in half to give some dimension.  Voila, leaves!


You've done the grunt work--now let's see it all come together into a thing of beauty.  To make the paper flower backdrop, you'll need:

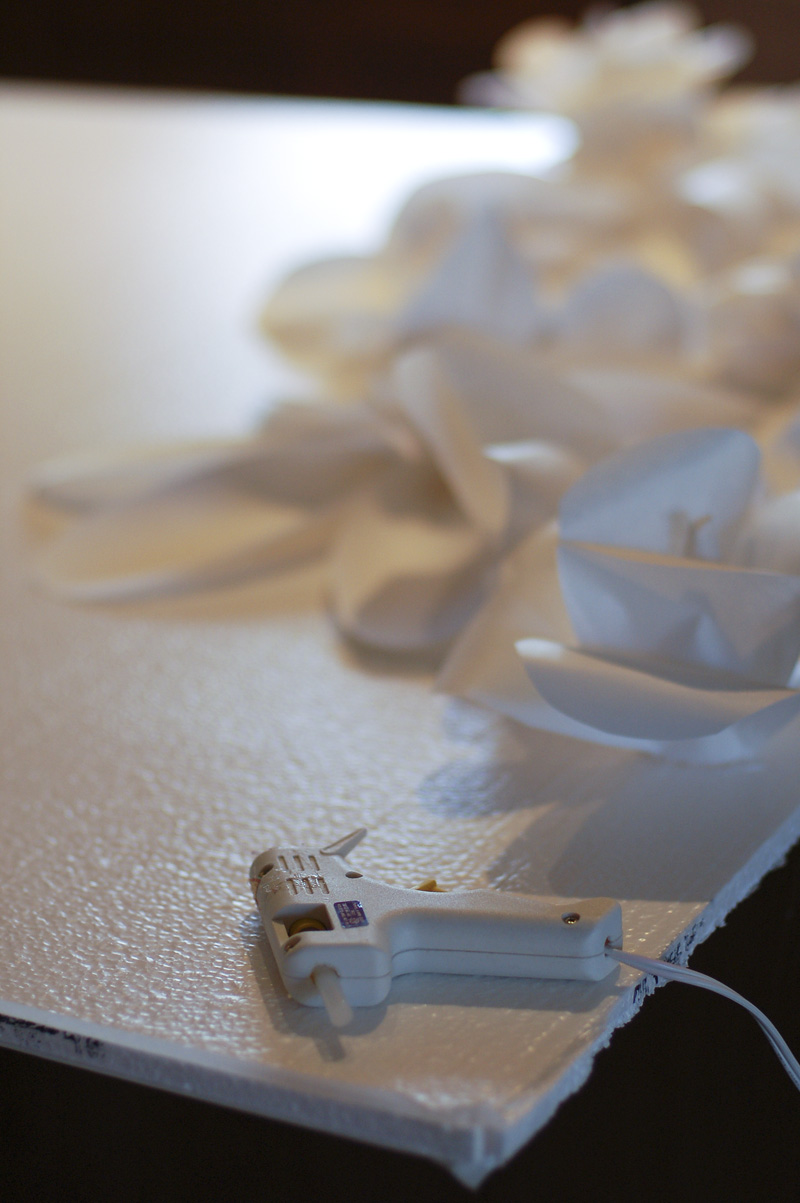
  • your trusty glue gun
  • your mountains of paper flowers
  • a 4 x 8 sheet of foam insulation sheeting from your local Lowes or Home Depot

The foam insulating sheet is lightweight, easily can be cut to whatever size or shape you want, and is very inexpensive.  I think I paid about $6.50 for mine.

Now all you need to do is use your glue gun and start sticking on those flowers!


Use the leaves to fill in the cracks between the flowers.  A little bit of the Styrofoam will still be visible, but when you're doing a white-on-white background like this, it just looks like part of the design.  If you were to do this project in a different color (I'd love to try it with wrapping paper!) I'd paint or cover the Styrofoam first.

I hope you've enjoyed learning how I made the backdrop for the Secret Garden baby shower.  I can imagine a ton of other applications for this type of project.  The most incredible photobooth backdrop ever?  cover cardboard columns and arches to make an insanely beautiful focal point for a wedding ceremony?  Me, I'm planning to re-use the backdrop as an art piece in my bedroom, whenever I get around to re-painting the awful purple sponge painting left behind by the previous owners.  

Tuesday, August 30, 2011

How to Make a Paper Flower Backdrop: Part 2, Roses

Here we are at part two of making a giant paper flower backdrop like the one from the Secret Garden shower.  Today it's all about the roses.

In case you missed yesterday's post, Part 1 of making the paper flower backdrop, this is what we're making:


You'll need the same materials as yesterday:  the same roll of paper, scissors, and a glue gun.

How to Make a Paper Rose


I'm talking about these:


First, you need to make a cone for the center of the rose.


Cut a rectangle of paper (top left image above).  Roll it into a cone (image on the right above).  I left a gap at the tip, because that looked like the center of a rose, and was easy.  Tape or glue the cone shape in place.  Then gently squish the cone flatish (bottom left image above--don't crease it, just squish it enough to trim both sides at once) and trim an arc on the bottom.  You'll be left with a perfect cone.  Or perfect enough.  Remember from yesterday, this project is not about perfection.  As long as the cone kind of sits reasonably on a flat surface, it'll be great.

Next, cut the petals.  You want shapes that are roughly teardrop shaped, and about the same height as the cone, or a little bit taller.

Then simply glue the petals around the cone.  Place three petals directly on the cone.  Five petals on the next layer.  Seven petals on the next layer (if you want a rose that big).  Once the petals are glued in place, you can gently curl the tops of the petals down, which makes the rose look even more fabulous.

How to Make Spiral Roses

As much as I love the look of the regular roses, they were the most time consuming flower to make on the backdrop.  The spiral roses were a great filler flower, because they were so darn simple and fast.    I'm talking about these guys:


First, cut a circle of paper.  Then cut it into a spiral. Be messy, be wobbly--that will make the petals have different lengths and give you extra texture.


Then just start rolling up the flower, starting on the outside of the spiral.  Once it's all rolled up, a dab of glue will stick it all together.  Did that make sense?  If not, watch this video I found.  It's great.

I want to mention one tip for making this project a lot faster: cut more than one item at a time.  Cutting petals?  Cut strips of paper and cut four or five at a time.  They'll all be exactly the same size, and you'll be done that much more quickly.  I spent about four or five hours on this project all together, but it would have been far more tedious if I'd been cutting one element at a time.

Tomorrow we'll learn how to make the last few elements of the paper flower backdrop, and will see how easy it is to put it all together.

Friday, August 26, 2011

DIY Project: How to Make a Onesie Bunting

Looking for this?  The blog has moved to Tikkido.com!  Find the full tutorial over there, and join us for lots of creative new content.

Onesie Bunting for a Baby Shower

Thursday, August 25, 2011

Real Parties: The Secret Garden Baby Shower (And Happy Blog Birthday!)

This August, I was delighted to have the opportunity to create a baby shower to welcome a new little girl into the world.  When the hostess told me that the theme was The Secret Garden, I was utterly delighted.  That Frances Hodgson Burnett novel had been one of my very favorites when I was young.  Turns out, the theme wasn't actually a reference to that children's book, but I still used it loosely as my inspiration to create a magical scene of a garden that felt almost like something from another world.


I immediately thought of the Chanel 2009 runway show, and knew what I wanted to do for my backdrop.  A garden wall of paper flowers, all white.  I wanted to play with texture, with light and shadow, more than color for this party.  I'll be posting a tutorial for how to make one of these show-stoppers for yourself, and you'll be amazed at how inexpensive and easy it is.

I wanted pink to be the predominant color of the desserts (it was a shower for a little girl, after all!)


Raspberry mousse is a delicious, delightfully pink dessert.  And any excuse to use my mini trifle dishes is a good one!


The brush-embroidery cookies were so easy to make, and looked so amazing (if I do say so myself!)!  I also love how my mirrored cake stands came out, and I can't wait to share the tutorial for those as well.  They added just the right sparkle and flash to the display.


The cupcakes were inspired by Zalita of Cupcake D'Lights.  Her cupcakes always astound me, and are so amazingly creative and detailed.  Head over to her Flickr stream for some serious beauty and inspiration.


When thinking about pink confections, I remembered these biscotti.  Pink pillows of deliciousness with a light vanilla and anise flavor.  The subtle sweetness of this traditional Italian recipe is absolutely addictive.  Good thing the recipe made a huge batch--plenty of cookies for me to taste test.  You know, for quality control.  Many thanks to the Zappanti family for sharing their family recipe with me for this party!

I carried the paper flowers theme through the table tents as well, using simple paper punches to create a miniature version of the backdrops.  Wouldn't these make absolutely stunning place cards for a wedding?


Pink Lemonade Tea Cakes were a fun and successful experiment.  I created the recipe as a riff on Russian Tea Cakes/Mexican Wedding Cakes.  All that buttery, tender goodness with a bright citrus flavor and pretty pink color.  Want to learn how to make them for yourself?  Pop over to The TomKat Studio blog for a how-to post and the recipe!


The lemon tartlets weren't pink, I know, but the flower shape and lemon flavor made them irresistible for the party.  


This was a baby shower, after all, so I created this simple, but utterly adorable onesie bunting.  


The beverages had white-on-white textural floral signs, too.  


As did the simple thank-you tags.  It's amazing how much elegance and dimension one little paper flower can add to a package!


Savory snacks included pork tenderloin mini sandwiches with a horseradish mustard spread.


Cheese and crackers are so much more special when the crackers are homemade rosemary sea salt crackers, and the plate is garnished with adorable miniature champagne grapes and raspberries.  


The bacon, date, and goat cheese streudel was a huge hit, and was so simple!  It's a great make-ahead appetizer.


For an activity, I came up with the idea of making custom paint-by numbers canvases.  The design was inspired by the bedding the mother-to-be had registered for.  Each guest at the party could paint a piece of the picture using the easy color-coded canvas and paints.


And after adding their contributions to the artwork, the guests signed the canvas.  An activity, a gift for the parents, nursery decor, and a loving memento of the people who came to celebrate the new baby, all rolled into one!

I'll be starting the series of how-tos for this party tomorrow, so be sure to come back for lots of great info!

And I have to note that this post marks the one year anniversary of my blog.  What a marvelous adventure this has been so far.   Thank you so much to all my readers for your comments, support, and friendship.  Here's to many more years to come!

Tuesday, August 23, 2011

Featured on The TomKat Studio Blog: A Secret Garden Baby Shower


Many thanks to The TomKat Studio for featuring our latest event, a Secret Garden baby shower.  Check out the post on The TomKat Studio blog today, then come back here tomorrow for all the details and the start of a string of really fun DIY project posts!

Floral Arrangements Incorporating Fruits and Vegetables

I just love creative, unexpected touches in floral arrangements, and one of my very favorite unconventional touches is the use of fruits and vegetables.  They can add such a dramatic element--often at a very affordable price if you take advantage of what's in season.


This strawberry bouquet made me swoon.  So fresh, so innovative!


And how incredibly sweet, simple, and beautiful is this arrangement with raspberries?  It conjures such happy memories of my grandparents' raspberry patch, and utterly spoiling my dinner with those sweet, sun-warmed berries.  That's exactly what a good floral arrangement can do:  set the scene and evoke a feeling.  


I just love this color palette.  And raspberries and peaches--my two favorite fruits!


In the fall, take advantage of bountiful apples to create striking but simple arrangements.  Something like this looks absolutely stunning, but is very easy for a DIY project.


I don't think I've ever seen a more elegant fall bouquet.  Apples and some filler.  How easy??


We often associate lemons with summer and lemonade stands, but they actually ripen in January.  They last an incredibly long time on the tree, however, and I can find all the free citrus I can handle here in the Phoenix area until early May.  I love simple lemon arrangements like this!  Another absolutely doable, easy DIY floral project.


Don't forget vegetables!  How fabulous is this bouquet with artichokes?


What a clever way to arrange the table cards!  It looks like a succulent garden.

Think beyond roses and carnations!  Don't be afraid to incorporate fruit, grasses, seeds, succulents, etc., in your floral arrangements.  Often these items are right out your back door--perfect for the do-it-yourself entertainer.
(All images found via Pinterest.  Click here to find the original sources.)

Tuesday, August 16, 2011

New Veil Edging: Embellished Pencil Edge

Silk tulle veils are absolutely gorgeous.  The fabric flows and drapes like nothing else in the world.  But that incredible softness and flow does behave very differently than standard bridal illusion veils, and sometimes edgings that work brilliantly on one fabric just aren't great on the other.

As a designer, you have to work with the fabric.  Understand its strengths and its limitations.  And figure out ways around the issues.

One such example is our pearl and crystal veil edging.


Now, I love the pearl and crystal edging.  I love it so much that I wore it for my own wedding (that's me!).  But as fabulous as it is with a bridal illusion veil, it just doesn't work all that well with silk tulle.  The pearls and crystals are just a little too heavy for the oh-so-soft and delicate fabric.  

So I started brainstorming ways to develop a new edging that would have a similar effect, but would work with the silk tulle.  The result is our embellished pencil edge.


The pencil edging gives a bit of extra structure to the delicate silk tulle fabric.  Just enough to be able to sew on an embellishment.  Shown here with all Swarovski crystals, it also looks spectacular with the same pattern of pearls and crystals on our pearl and crystal edging.

We can do this with any pencil edging, but I especially like the silver pencil edging.  The silver defines the edge lightly, but because it reflects the light more than a white or ivory edging would, the effect is actually much more subtle.  And that lets the pearl and crystal embellishments really shine.

So you want a silk tulle veil?  You want some sparkle and dazzle, too?  This is a fabulous option that takes advantage of all that silk tulle has to offer.


Friday, August 5, 2011

Thursday, August 4, 2011

New Product: Chalkboard Wine Charms!

I just love creative uses for chalkboard paint.  Love.  Love love love.

Do you remember my post on the chalkboard labeled glasses?

And how awesome is this idea for a chalkboard table runner from Rock-ur-Party?


Or how about this amazing yet simple dessert table backdrop featured on the Amy Atlas blog?


Yep, I'm enchanted.  So I was particularly pleased with myself when I came up with this new idea:  wine charms made from natural stone that work just like a chalkboard.


Hooray, a fun chalkboard item that I created!  I feel like I finally got to join the party.  Already for sale on our Etsy store, and soon to be available on the tradewindtiaras.com website!

Wednesday, August 3, 2011

A Vow Renewal--Vegas Style!

First, let me apologize for being a bad, bad blogger.  I guess I just needed a little bit of a summer vacation.  But I have all sorts of wonderful posts lined up, and I'm so excited to share it all.  It feels great to say "I'm back!"

Let me start with the natural follow-up to my last post.  Grandma came to watch the girls, and my husband and I drove to Las Vegas to celebrate the 10th anniversary of one of my best friends, Elspeth.  It was four days of great fun, grand Vegas kitch, and a lot of love.  And ridiculously tall drinks.


What Vegas vow renewal would be complete without a showgirl and Elvis officiating?


Elspeth wore the tiara I'd designed for her ten years ago, and I'm happy to report that it was as sparkly and gorgeous as the day it was made!  I can't wait to see it again in another 10 years.


The very special ring Elspeth picked out for the ceremony.  I love this girl--such style, beauty, and a great sense of humor!


Congratulations, Beth and Dan!  I love you guys, and am so glad I was able to help celebrate this wonderful milestone in your lives.

bethanddan